Installing And Configuring Docker
Docker is an open-source platform that automates the deployment, scaling, and management of applications using containerization. Containers package an application and its dependencies together, ensuring consistency across different environments. This makes it easier to develop, ship, and run applications reliably on various systems.
Table of Contents
It is recommended you follow this tutorial in the order listed.
- Download Docker Desktop
- Using Windows Subsystem for Linux (WSL)
- Install Host Dependencies
- Building Containers
- Running Containers (Using the Environment)
- Configuring Containers
- Installing Useful Programming Tools
Download Docker Desktop
- Go to this link and download the correct docker version for your system.
- Sign in to docker with your multirotor-associated GitHub.
-
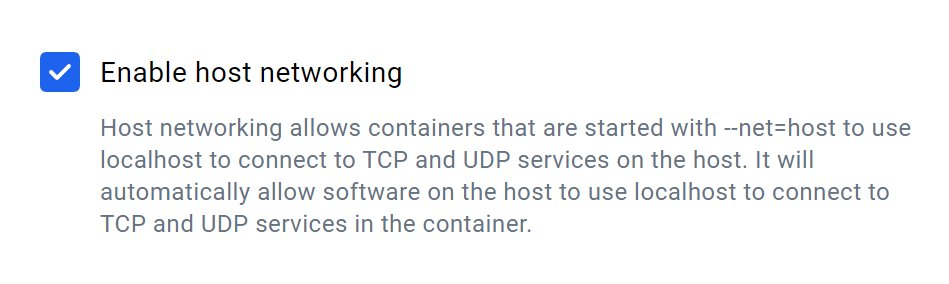
Once signed in, go to settings → resources → network and turn on “Enable Host Networking” as shown in the image below
- Continue to the next step
Using Windows Subsystem for Linux (WSL):
On Windows, you can install a more lightweight Linux VM using Windows Subsystem for Linux (WSL). To install Ubuntu 24.04 using WSL, open a PowerShell instance and run the following:
wsl --install "Ubuntu-24.04"
To run your virtual machine, execute wsl in any PowerShell/Terminal. To see more commands, you can use wsl --help.
If you will be using our custom Unreal-based simulation (or need to network between native Windows programs and programs running in WSL), it is easiest to use mirrored networking mode. Unfortunately, this is only compatible with WSL2, meaning that Windows 11 is required.
Install Host Dependencies
Next, change directories to the repository:
cd SUAS-2025
In the repository, we have a script to install the necessary host packages. If you do not need GPU access when coding, run the following:
./install.sh
If you need GPU access, run the following:
./install.sh nvidia  # if you have an nvidia GPU
# OR
./install.sh amd     # if you have an AMD GPU
AMD GPUs are currently not supported (I have an Nvidia GPU, so I don’t know the AMD install stuff). If you have an AMD GPU, feel free to add to the installation script and docs!
You will also need the drivers corresponding to your GPU:
- Nvidia CUDA Toolkit: https://developer.nvidia.com/cuda-zone
- AMD ROCm Install: https://rocm.docs.amd.com/projects/install-on-linux/en/latest/install/quick-start.html
You will need to restart your terminal/shell for the installation to complete.
Building Containers
To simplify (most) of environment setup, we have containerized our environment. Specifically, we use Podman, which is pretty much the same as its more popular counterpart, Docker. (Podman and Docker both follow the Open Container Initiative standards, so they are largely interchangeable.)
We use a companion command called podman-compose (similar to docker-compose) that allows us to define how to run our containers in a compose.yml file.
To build our containers, run the following command from within the SUAS-2025 folder:
podman-compose build
This may take a while, so do something else in the meantime.
Running Containers (Using the Environment)
We have two containers: env and sim. The env container contains everything you need to run your code; the sim container will run an ArduPilot drone simulation upon startup.
By default, the
simcontainer is meant to be used with the Simulation Subteam’s Unreal simulation. If you need to override this, use thecompose.override.ymlfile to override thecommandproperty for thesimservice to the desired command you can run (see here). If you don’t know how compose files work, you can look tocompose.ymlfor reference or read this.
For ease of use, we have a run_container.sh script. To run both env and sim, simply run:
./run_container.sh
To run the env container on its own, run:
./run_container.sh env
To attach to the env container (connect to it using an interactive shell), run:
./run_container.sh attach env
Your local SUAS repository code will be mounted in the
envcontainer, so any changes made to your local copy of the code is automatically reflected in the container, and vice versa. Essentially, theenvcontainer is a glorified virtual environment.
To detach, run the following:
exit
This will also shut down the
envcontainer; you’ll need to start it again.
To shutdown any running containers, do:
./run_containers.sh shutdown
For more commands, run:
./run_containers.sh help
If you want to take matters into your own hands, you’ll need to know how to run/use containers:
podmanDocumentation: https://docs.podman.io/en/latest/Tutorials.htmlpodman-composeDocumentation: https://docs.podman.io/en/latest/markdown/podman-compose.1.htmldockerDocumentation: https://docs.docker.com/build/- 99% of stuff that applies to Docker applies to Podman
docker-composeDocumentation: https://docs.docker.com/compose/
You have completed the docker installation and can head back to the previous instructions. Below is information about how to modify the docker containers.
Configuring the Containers
If you need to configure how a container is run, create a file called compose.override.yml in the SUAS repository’s root directory. This file will allow you to override parameters set in compose.yml without modifying up compose.yml. If you ran install.sh with a GPU selected, compose.override.yml should already exist.
For more information on compose files, see the following:
podman-composeDocumentation: https://docs.podman.io/en/latest/markdown/podman-compose.1.htmldocker-composeDocumentation: https://docs.docker.com/compose/
Example: Overriding The sim Container’s Start Command
By default, the sim container is configured to run the following command on startup:
python /ardupilot/Tools/autotest/sim_vehicle.py -v ArduCopter -f airsim-copter --out=127.0.0.1:14550
This is the command needed to connect to AirSim (the foundation of the Simulation Subteam’s Unreal-based simulation of the SUAS competition). If you need to run a different command, you can use compose.override.yml:
version: "3"
services:
  sim:
    command: python /ardupilot/Tools/autotest/sim_vehicle.py -v copter -L GolfCourse --map
This will override the command field for the sim service; essentially, whatever is in the command field will run upon container startup. The example above works for a non-Unreal based drone simulation.
If you already have content in compose.override.yml, such as enabling GPU usage, just append what you need to the file:
version: "3"
services:
  env:
    deploy:
      resources:
        reservations:
          devices:
            - driver: nvidia
              count: all
              capabilities: [gpu]
  sim:
    command: python /ardupilot/Tools/autotest/sim_vehicle.py -v copter -L GolfCourse --map
The above combines the alternate sim command with an Nvidia GPU-enabled env container.
Installing Useful Programming Tools
Visual Studio Code
Visual Studio Code (VS Code) is a popular code editor with numerous free extensions you can download to add features and customizations; however, if you wish to use a different IDE/text editor, feel free to do so.
If you are using WSL, VS Code might already be installed. You can check if VS Code is installed by seeing if the following command has any output:
which code
If VS Code is not installed, you can run the following command to install VS Code:
sudo snap install --classic code
Then, to open VS Code, simply run the following command in the directory you want to edit code in:
code .